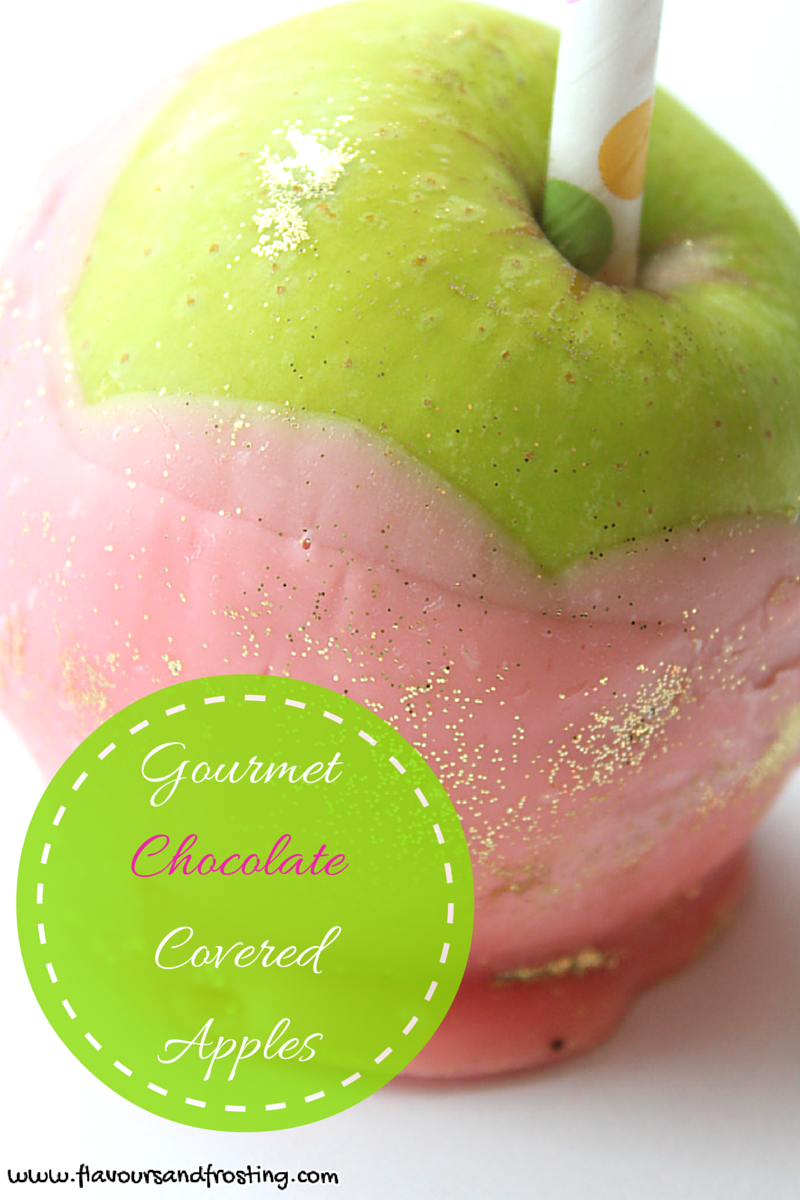
Gourmet Chocolate Covered Apples
I made these Gourmet Chocolate Covered Apples for a Baby Shower that was held recenlty by our church. The idea was to give out favors to all the ladies that came to the event.
Gourmet Chocolate Favors
I love party favors because they say: THANK YOU for taking time out of your busy schedule to join me at my event and/or for bringing a gift.
Thank You is a word we use alot of perhaps not often at all (depending on our customs – for example here in Spain people dont say thank you as much as we do in South Africa).
I like saying Thank You and I like showing my appreciation. I think it is the little things like these that make the world a better place. A happier place.
How to make chocolate covered apples?
It´s realtively easy. I promise *smile*. All you need are a few materials and ingredients and to follow the step by step instructions below!
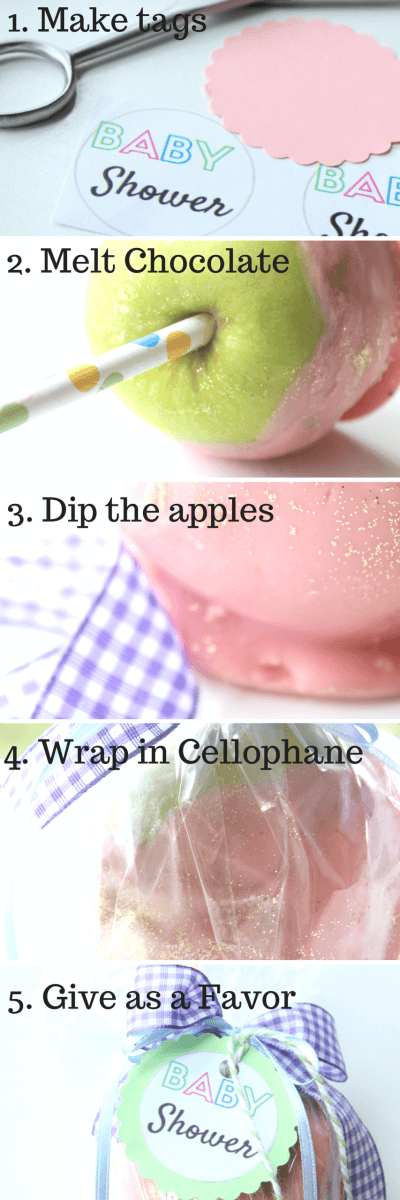

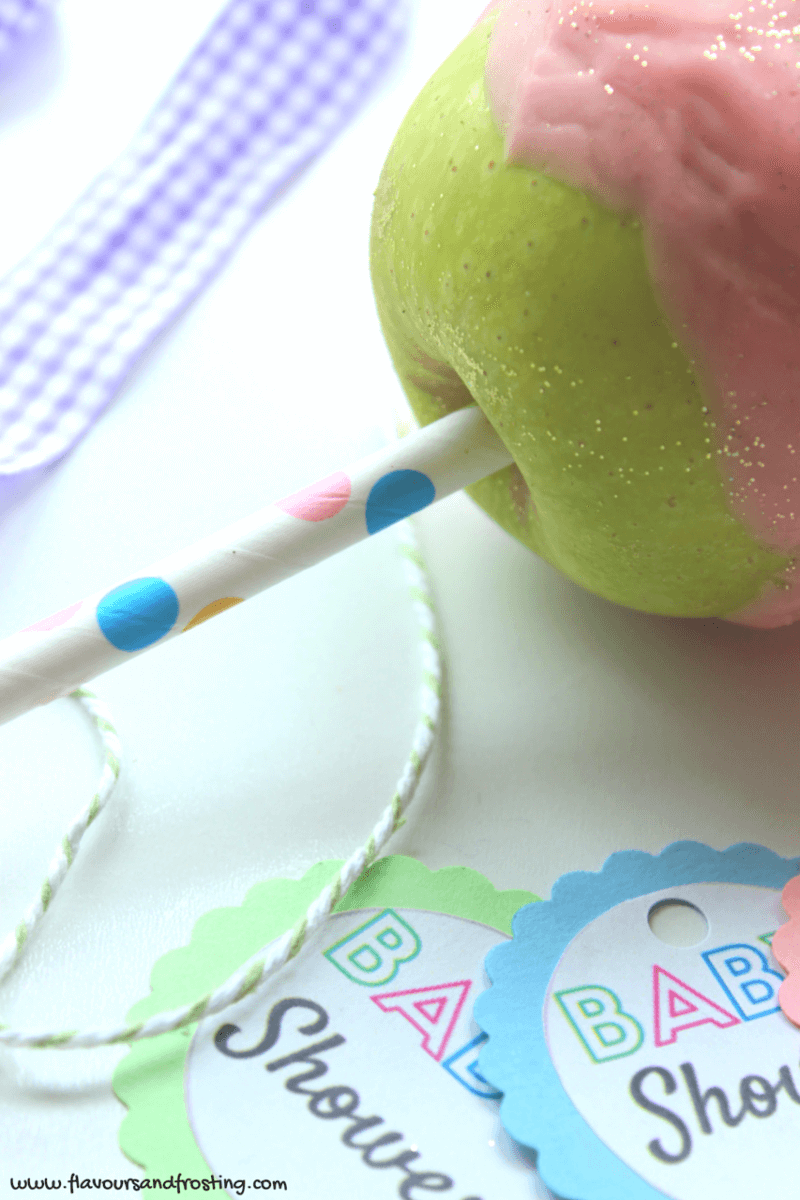
1. Make Tags
The first thing I did was to make the tags. I designed something on Canva and imported it into PhotoScape where I designed an A4 page filled with circles. There, in PhotoScape I cloned the design I made in Canva and placed one in each circle. I´m sure there are easier ways but that´s how I did it.
Then I used my scalloped edge circle punch to cut out pastel pink, blue and green cardboard circles. I stuck the labels that I designed (which I needed to cut by hand because I dont have one of those nifty, fancy Martha Stewart craft circle cutters). I clearly need one of those because it took me ages!
After that, I punched a hole in each tag, top centre, to thread the ribbon through later.
2. Melt Chocolate
I used pink Wilton Candy Melts, green Wilton Candy Melts and these turquoise ones (unfortunately I didn´t take any photos of the green and turquoise chocolate covered apples). Note: I used red apples with the green melted chocolate because I thought it would be silly to do green on green..
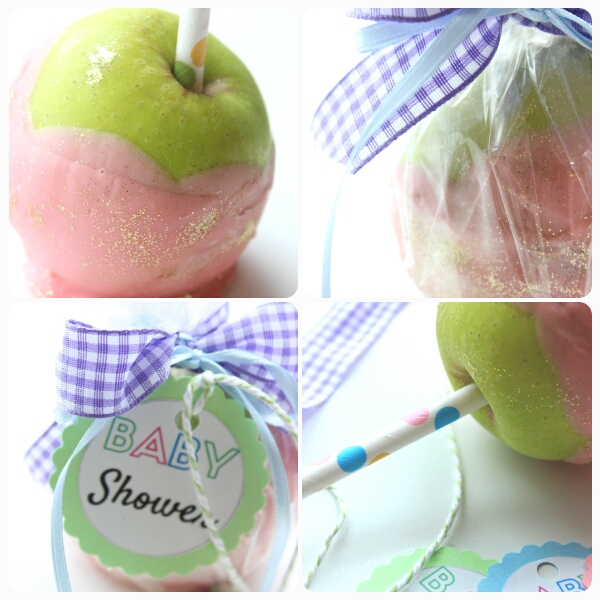
I then melted the CandyMelts in the microwave at 30 seconds intervals (approximately 2 minutes) until all the chocolate was melted. While the chocolate was melting, I removed the stalk from the apples and replaced it with a stick. I used these cute polka dot paper straws. You could also use lollipop or popsicle sticks too.
3. Dip the Apples
Now it´s time to dip your apples into the melted chocolate and allow the excess chocolate to drip off. Place on a baking sheet (prepared before hand with a piece of wax paper). Allow them to set properly before dipping them into the melted chocolate for a second time. If your chocolate is too thick, heat it up for another 15 seconds in the microwave.
Top Tip: make sure your apples are cold (if possible leave them overnight in the fridge). This helps the melted chocolate to cling easier to the apple and it sets faster.
4. Wrap in Cellophane
Once all your apples have been covered in chocolate, and have set and dried properly, it´s time to turn them into stylish gourmet chocolate gifts *smile*.
I used cellophane to wrap mine and tied them with bakers twine. I then added the tag/label that I made with cute gingham check ribbon. Aren´t they just adorable?!
5. Give as a Favor
All you have to do now is to give them out as favors at your next party. Everyone will love them. They are such an easy, inexpensive gift that (almost) everyone loves!
How to store chocolate covered apples
I get asked this question often and the answer is simple: keep them in the fridge. The cellophane protects the apple from building up moisture.
This is a must, especially during the warmer Summer months (which are just around the corner – or so they claim – it´s freezing here today!) because the chocolate might melt.
Thanks for reading this post and I hope that I´ve inspired you to make your own gourmet chocolate covered apples 🙂 Until next time!
Johlene
xoxo
LOVE! But it’s hard to believe that PINK stuff is chocolate! 😮
Hahaha! But it is.. 🙂
I love this idea for party favors! And you KNOW I am always down for some disco dust action. 🙂 Lovely Johlene!
Haha! Disco Dust Action – just love it!
These are so cute! I need to find me some colorful chocolate melts!
I love the colored chocolate melts too. You could also buy the Wilton chocolate colorants (and color the chocolate yourself) but they dont work well for me. I prefer the Wilton candy melts.
These are so pretty! Love the colors and I am sure they taste amazing!!
Thanks for sharing at Try a Bite Tuesday Link Party! I’ll be pinning these to the pinterest board! Hope to see you back next week!
Thanks Amber, I´m pretty sure I´ll be back next week. Thanks for pinning!!
What a sweet idea, and something the mum to be can enjoy without feeling guilty about it.
Haha! Yeah! The Mum get´s to have fun too 🙂
This reminds me of when we did candy apples for my sister in law’s bridal shower! We used little tags that said “apple of my eye”. Love this idea!
How cute is that: “apple of my eye”. Love it! I´m going to get more creative with my tags in the future!
I love caramel apples, but chocolate covered ones sound even better! So cute too!
I think if I had to choose because of taste the caramel ones would win by far! The good thing about the chocolate ones is that you can be more creative with colors etc.
oh I love the pink Wilton Candy Melts! so festive and fun! and love these chocolate covered apples. . what a great idea!!!
Me too! They are so pretty. I´m a huge lover of pink but I guess you knew that already looking at my blog *smile*