So you´ve set up your own dessert blog after you read my article on How to start a dessert blog but now you´re wondering “how on earth do I do a dessert post?”
Don´t fear, I´ve got you covered. In this post we go through all the steps necessary for a successful blog post for a food blog in WordPress. You can apply these steps (up to point 5) in Blogger too.
How to do a blog post for a dessert blog in WordPress
How to do a blog post for a dessert blog in WordPress. We go through all the steps necessary for a successful blog post for a food blog in WordPress
I´m going to take you through the steps I take when I write my blog posts. After this post I have confidence you´ll have adequate basic knowledge to go ahead and write your very first blog post (or perhaps
1. Numero Uno
Number 1 on the list, is to choose the dessert you want to post about. I have a few ways of doing this, one of them being my “secret” board on Pinterest “with ideas I want to make next” (trust me, on Pinterest you´ll never run out of inspiration). Now let´s be clear on this, one thing is to be inspired but another is to copy someone else´s idea. Be creative! Make it your own!
Also, I like to be frugal with my dessert posts and see what groceries I have in my house at the time or perhaps I have leftover frosting from cupcakes I made for my previous post.. I dont like to waste anything!
2. Now comes the fun part
The actual making of the dessert. This is my very favorite part of dessert blogging. I love being creative! I normally make/bake my desserts + do the photoshoot on one day, then on the next I´ll write my post.
Tip: You could prepare a few desserts on one day, take a couple of photoshoots and that will give you content for a couple of weeks. This is not easy and requires planning but it does help in the long run, especially for those unforseen circumstances like your little one falling ill.
Another great tip: be flexible and don´t be too rigid with your post planning as this will create unnecessary stress.
Make sure you have all the ingredients, materials and equipment you need for every blog post. There is nothing worsts (well there is but I´m just being dramatic) to find you don´t have cocoa powder when you´re making your favorite chocolate layer cake (you get my drift..)
3. The Photoshoot
This is another fun one for me, the actual photoshoot. To be honest, this is also the part that I can stress the most. There is nothing worsts (here I go again) to make the most beautiful dessert you´ve ever seen, you´re still in awe that you actually made it, and then to find your photos didn´t come out nicely. Top tip when it comes to dessert photography: don´t clean-up the scene before checking the photo quality on your pc. I dont know how many times I have given the desserts to my family, friends, neighbours, cleaned up everything to find that the photos dont look good..
How to style your photoshoot
- Think about the color scheme and theme of the dessert.
- White crockery works best with food styling.
- Add a pretty pink napkin or even a pretty pink flower from your gardent to tie in with the color scheme.
- I use to like many props in my dessert photo shoots but I´ve come to love the minimilistic look and let the focus be on the dessert I made and not the props.

For more on Photography Tips, visit my Photography Page.
Lynda.com (link code below) offers a multitud of courses in Photography, Editing, WordPress, you name it. Even better – they offer a 10 day free trial (link code below) and I don´t know about you guys but I love getting things for free! That means you can do as many courses as you want or can (for free) in 10 days!
Get 10 days of free unlimited access to lynda.com.
4. Edit your photos
After you´ve done your photoshoot and you´re happy with the quality of your photos, there are a variety of programs you could use. I use Photoscape and/or Canva (see video tutorial below: Getting Started with Canva). Both of these programs are free to use if you use them to edit your own photos. There is also Photoshop and the basic program is free, however the paid version allows you much more but I wouldn´t worry about that to much when you start out.
https://youtu.be/-6NKQrL2OD8
If you decide to go the Photoshop route, you could do a course at Lynda.com.
Get 10 days of free unlimited access to lynda.com.
Top tip: don´t spend too much time editing your photos, as it is easy to get obsessive about this. The more photos you take, the better you´ll get at it.
5. Time to write your blog post
The first thing you´re going to do is your keyword planning. I do mine with the Google Keyword Planner. I´m planning to write a seperate post about this in more details but for now it is imporant that you remember that Google sends their spiders to crawl the web to build their index. That´s why you need to do proper keyword planning to ensure those keywords are in your post title, meta description, alt tags in your images and in your post content. That way Google can find you easier. Remember to submit a Sitemap (where you can list the web pages of your site) to Google to tell them and other search engines about the organization of your site content. Search engine web crawlers like Googlebot read this file to more intelligently crawl your site.

Once you have done your keyword planning it is time to do write the actual post. I use the plugin called Yoast SEO. Read more about it in my post about how to start a dessert blog.
Research says that post with 1500 word minimum is the most read. However there are bloggers that write far less words and have a good success rate. Don´t get too tied up with all the rules and regulations on effective SEO, for sure use it but the most important thing is that you write from your heart. Be yourself! Write what you have learnt during the process of making the dessert. Share this knowledge with your readers and they´ll be coming back for more. Transparency is key. People love honest, real bloggers.
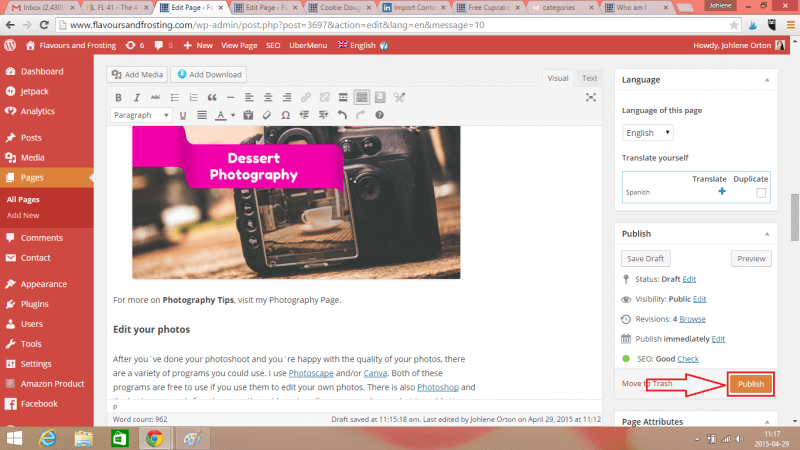
6. Finally it´s time to publish your post!
This is the easy part, once you´ve checked your grammar, made sure you´ve added alt tags to your images (which Google uses to help its search algorithm better judge what images are and how they relate to a particular search term).
Also make sure your SEO is intact (if you use the Yoast plugin I mentioned, you would have a green light). Now simply hit the Publish button (see image below) and voila your post is live, for the whole world to see!
Remember to share your post on your social networks too! I use the Flare plugin to help me with this. This plugin allows you to share directly from your post to your social networks that you have plugged in to it.

I truly hope that this post inspires you, encourage you, gives you the confidence to create your very own dessert blog post.
Happy dessert blogging!!
Johlene
xoxo
Leave a Reply